


USER MANUAL
Important Note
Please make sure to remove the protective film on the mouse feet for optimum performance.

FACTORY DEFAULT SETTINGS
Mouse Profiles
Profile 1: 400 DPI / Red LED / 100% LED Brightness
Profile 2: 800 DPI / Blue LED / 100% LED Brightness
Profile 3: 1600 DPI / Green LED / 100% LED Brightness
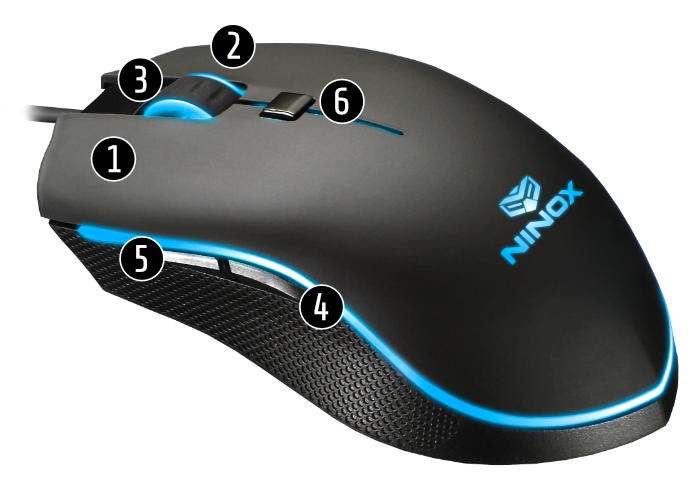
Button Layout
1: Left Click
2: Right Click
3: Middle Click, Scroll Up, Scroll Down
4: Rear Side Button (Internet Backwards)
5: Front Side Button (Internet Forwards)
6: Profile Button
CHANGING SETTINGS
- Choose the profile you would like to use (or edit) by pressing the [Profile Button] (Button 6) to cycle through profiles.
- Once you have chosen a profile, you can edit its settings by holding down the [Profile Button] for 5 seconds. The LEDs on the mouse will flash 3 times to indicate you may begin changing settings. Mouse movement will be disabled when changing settings.
- Using the mouse buttons, you may change settings on the mouse. Please refer to the information below.
- When you have finished changing settings, hold the [Profile Button] for 5 seconds. The LEDs on the mouse will flash 3 times to indicate your settings have been changed, and mouse movement will be re-enabled.
Choosing DPI
- DPI Up Front Side Button (Button 5)
- DPI Down Rear Side Button (Button 4)
- Note: When changing DPI, the LEDs will change colour briefly, to indicate which DPI has been chosen.
- DPI Steps:
• 400 [White]
• 800 [Red]
• 1000 [Pink] * Firmware V1.1 Only
• 1200 [Magenta]
• 1400 [Violet] * Firmware V1.1 Only
• 1600 [Blue]
• 1800 [Sky Blue] * Firmware V1.1 Only
• 2000 [Cyan]
• 4000 [Green]
• 6000 [Toxic Green] * Firmware V1.1 Only
• 8000 [Yellow]
• 12000 [Orange]
Choosing LED Colour
- Previous Colour Left Mouse Button (Button 1)
- Next Colour Right Mouse Button (Button 2)
- LED Colour Options: • White • Red • Pink • Magenta • Violet • Blue • Sky Blue • Cyan • Green • Toxic Green • Yellow • Orange
Choosing LED Brightness
- Cycle through brightness levels Middle Click (Button 3)
- LED Brightness Options: • 0% (off) • 25% • 50% • 75% • 100%
Choosing Lift Off Distance (LOD) * Firmware V1.1 Only
- High LOD Scroll Up
- Low LOD [Default] Scroll Down
Choosing USB Polling Rate * Firmware V1.1 Only
- Step 1) Select the mouse profile which you would like to change the USB polling rate for.
- Step 2) Unplug the mouse, then hold down one of the buttons below, while you plug in the mouse.
- 500hz (2ms) Rear Side Button
- 1000hz (1ms) [Default] Front Side Button
- Step 3) The profile you had selected when you unplugged the mouse, will now be set to the chosen USB polling rate.
Reset to factory settings * Firmware V1.1 Only
- Hold down the Left and Right mouse buttons when plugging the mouse in.
Video
Thanks to Screenbite for their video guide for the Venator! (In English language) Watch it in the video below:
Button reassignment and macros
It is possible to reassign buttons and create macros to use with the Venator with software. Please see the list below for recommendations:
- Mouse button reassignment:
- Macros: